Setting Up Single Sign-on (SSO) in ParkMyCloud
ParkMyCloud, as of v3.8, supports single sign-on (SSO) using Security Assertion Markup Language (SAML) 2.0, and integrates with the top IDaaS (Identity as a Service) providers, according to Gartner:

Source: Gartner, June 2016


Source: Gartner, June 2016
- Active Directory Federation Services (ADFS)
- Azure Active Directory
- Centrify
- Okta (In the Okta App Network)
- OneLogin (In the App Catalog)
- Ping Identity (In the App Catalog)
Additionally, we also integrate with G-Suite (a.k.a., Google Apps).
Purpose
The purpose of this article is to walk you through the steps of configuring ParkMyCloud and your identify provider to support both IdP-initiated and SP-initiated SSO.
Note: If you want to understand more about how SAML 2.0 works, you can access the detailed documentation here.
SAML Configuration in a Nutshell
Essentially, to configure SAML you need swap the following information between the Service Provider (SP, in this case, ParkMyCloud) and your Identity Provider (IdP):
The trick is to know where to find this information in ParkMyCloud and in your particular Identity Provider. This article will focus on the ParkMyCloud Settings.
Overview of ParkMyCloud Settings page
To begin SAML configuration, select Settings from the left menu:
By default, SAML is disabled. To enable it click on the Single Sign-on pull down menu:
Here you will see a couple of settings to choose from:
- Allowed for all users - this setting will allow you to configure local users (those who log in locally to ParkMyCloud with their username and password) as well as SSO users. If you are an existing customer who already has local users, this is the setting you probably want to use, while you transition your users over to SSO.
- Required for all users except admins - this setting only allows SSO access for all users, except the super admin users. Super admins can still log in locally. This safeguard ensures that if SAML is misconfigured, you still have access to the application.
For purposes of this discussion, we will configure this using the Allowed for all users setting.
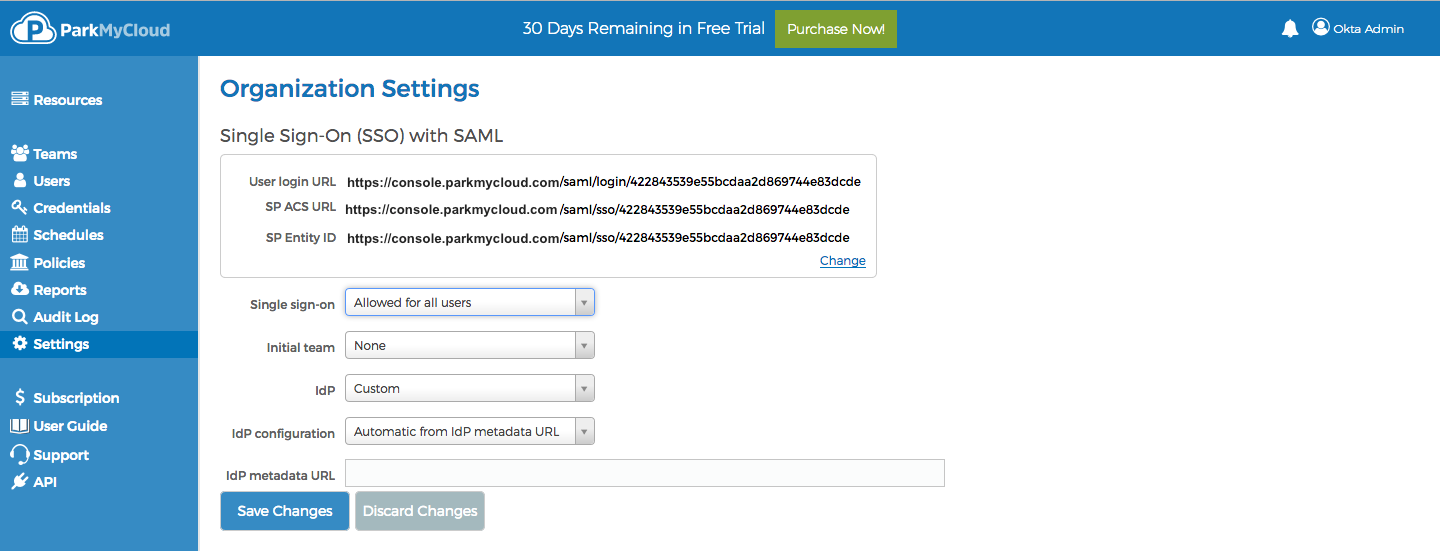
Once you have enabled SAML, your settings will look something like this:
The login URL is what you will give your users. They will use this to initiate what is known as SP-initiated SSO (SP is short for "service provider").
The SP ACS (short for "service provider assertion consumer service") URL and the Entity ID URL will be used to configure your Identity Provider. (More on that later.)
If you want to customize these URLs to create something a little easier to remember, click on "Change" and enter the new text. For our purpose, I will use "okta".
Next, you can pick the initial team that all SSO users will be members of, once they successfully login and their user account is created. In this case we selected Team Okta.
Next, we need to tell the application what type of identity provider (IdP) to expect. The choices are Custom or Azure AD. Well, we're not doing Azure AD, so, leave that as Custom.
Next, we need to select the type of IdP Configuration. From what we can ascertain at the writing of this article, the IdP providers support one or more of these methods as shown:
- Automatic configuration using an IdP metadata URL from your identity provider. NOTE: This is the preferred approach
- ADFS
- Azure AD (Only approach supported)
- Google Apps
- Okta
- Semi-automated using an IdP metadata file you downloaded from your identity provider:
- ADFS
- Google Apps
- Okta
- OneLogin
- Ping Identity (This is the preferred approach for Ping)
- Manual, where you enter all the information from your identity provider:
- ADFS
- Google Apps
- Okta
- OneLogin
- Ping Identity
For the purpose of this discussion, we'll select the automatic method and fill-in the IdP metadata URL:
I know you must be asking: Where on earth did you get that information?? A great question. Other articles will walk you through configurations for the various identity providers. Those articles will bring you back to this page, where you need to copy information to help configure your IdP server, and where you will paste in configuration from the IdP server for use here.
For now, we'll assume we have already done that and save the changes to complete this section.
Once this configuration is complete, you will merely need to give the User Login URL to your users.
When they access this URL for the first time, they will be taken to your IdP server to be authenticated. Once authenticated, they will be redirected back to ParkMyCloud where their account will be automatically created (also known as "just-in-time provisioning").
They will be created within ParkMyCloud with a team member (lowest privilege) role. The super admins or team leads can promote them to other roles from there, and shift them to different teams, if desired.
Configuring Your Identity Provider
If you are ready to begin configuring your Identity Provider, then one of these articles may be of help to you:
Related Articles
Setting Up Ping Identity As An IdP Server for ParkMyCloud
The purpose of this article is to guide you in setting up Ping as an Identity Provider (IdP). In this example we will use PingOne for SaaS applications. For more information, consult the Ping Documentation. To start with, log in to ParkMyCloud as a ...Setting Up OneLogin As An IdP Server for ParkMyCloud
The purpose of this article is to guide you in setting up OneLogin as an Identity Provider (IdP). For more information, consult the OneLogin Documentation. Spoiler Alert: Using the semi-automated configuration approach (uploading an IdP metadata ...Setting Up Azure Active Directory (Free Version) As A SAML IdP Server for ParkMyCloud
When you followed our article on creating an Azure credential, that process included creating an application in Azure. We are now going to revisit one of those applications and configure some of its settings to configure Azure Active Directory as an ...Setting Up Okta As An IdP Server for ParkMyCloud
Setting up Okta as an Identity Provider (IdP) is probably the most straightforward of all the IdP providers and their own documentation is great. Of the providers out there, they had the best developer support. You can find out more from the Okta ...Setting Up Centrify As A SAML IdP Server for ParkMyCloud
Setting up Centrify as an Identity Provider (IdP) is less straightforward then other IdP providers . You can find out more from the Centrify Custom SAML Application Documentation. Spoiler Alert: Using the automated configuration approach (IdP ...