Creating an Azure Credential Manually Using Azure CLI
1. Install azure CLI (linux shown below) using NodeJS install:
- if nodejs, npm and/or azure-cli are not installed:
curl -sL https://deb.nodesource.com/setup_7.x | sudo -E bash -sudo apt-get install -y nodejssudo npm install -g azure-cli
2. Login with azure cli:
azure login -u some_user@youraccount.com
Outputinfo: Executing command login
Password: *************
-info: Added subscription <Subscription Name>
info: Setting subscription "<Subscription Name>" as default
+
info: login command OK
NOTE: You can also do this without the "-u" to pop-up web browser for login, if available.
3. Get the Subscription ID and Tenant ID:
azure account show
Output
azure account showinfo: Executing command account showdata: Name : <Subscription Name>data: ID : 00aaa000-00aa-0a00-0000-0a0000a0aa00data: State : Enableddata: Tenant ID : 0b00b0b0-0000-0000-00b0-bbb0b0b000bbdata: Is Default : truedata: Environment : AzureClouddata: Has Certificate : Nodata: Has Access Token : Yesdata: User name : some_user@youraccount.comdata:info: account show command OK
Here you have the first two pieces of information:
- Subscription ID (in this case, 00aaa000-00aa-0a00-0000-0a0000a0aa00)
- Tenant ID (in this case, 0b00b0b0-0000-0000-00b0-bbb0b0b000bb)
Note: If you wish to use a subscription other than the default then use the following command:
azure account show -s <Other Subscription Name>
And use the ID and Tenant ID number from that output.4. Get Client ID/Application ID and the Key:
For this step you will need to create an application within your subscription. From the command line this can be done by typing:azure ad app create -n "<Application Name>" -m "<Application Home Page URL>" -i "<Application Identifier URL>" -p "<Password>"
In this example, I used the following values:
- Application Name: "PMC Azure Dev"
- Application Home Page URL: "https://console.parkmycloud.com"
- Application Identifier URL: "https://PMC-Azure-Dev-not-used"
- Password: "parkmycloud!"
Outputinfo: Executing command ad app create
info: Creating application PMC Azure Dev
data: AppId: 000kkk0-00kk-0000-k00k-00kk0000000k
data: ObjectId: 00mm00m0-0000-0m00-mmm0-m000mm000mmm
data: DisplayName: PMC Azure Dev
data: IdentifierUris: 0=https://PMC-Azure-Dev-not-used
data: ReplyUrls:
data: AvailableToOtherTenants: False
data: HomePage: https://console.parkmycloud.com
info: ad app create command OK
Here you will need to copy the AppId (in this case, 000kkk0-00kk-0000-k00k-00kk0000000k).Your App Access Key is simply the password you just entered (in this case, parkmycloud!).At this point you have everything you need for ParkMyCloud. However, there are a few more steps you need to complete the configuration on the Azure side.
5. Create a Service Principal for the Application:
- You will need to create a Service Principal for the application by passing the Application ID from above:
azure ad sp create -a <Enter the App ID from above here>
Output
info: Executing command ad sp create
+ Creating service principal for application 00ppp000-00pp-0p00-0000-0p0000p0pp00
data: Object Id: cc00c00c-cc00-0c00-cc0c-000cc00c0000c
data: Display Name: PMC Azure Dev
data: Service Principal Names:
data: e0e00e00-0000-0ee0-0e0e-0eeee00e0000
data: https://PMC-Azure-Dev-not-used
info: ad sp create command OK
- Copy the Service Principal Object ID from the response for the next step.
6. Create a Custom Role with Limited Permissions:
- Get the example role from the ParkMyCloud console Add Credential page, and paste it into a file (we called it PMCAzureExampleRole.json). It may look a little different from what's below, but you get the idea. (The latest permissions example will always be found in the ParkMyCloud console).
- Suggest you give it the same name as the application
- Perhaps referencing the application name in the description would also be helpful
- Enter the subscription ID from step 3 as well:
{
"Name": "PMC Azure Dev",
"Description": "PMC Azure Dev Role",
"IsCustom": "true",
"Actions": [
"Microsoft.Compute/virtualMachines/read",
"Microsoft.Compute/virtualMachines/*/read",
"Microsoft.Compute/virtualMachines/start/action",
"Microsoft.Compute/virtualMachines/deallocate/action",
"Microsoft.Compute/virtualMachineScaleSets/read"
"Microsoft.Compute/virtualMachineScaleSets/write"
"Microsoft.Compute/virtualMachineScaleSets/start/action",
"Microsoft.Compute/virtualMachineScaleSets/deallocate/action",
"Microsoft.Compute/virtualMachineScaleSets/*/read",
"Microsoft.Resources/subscriptions/resourceGroups/read"
],
"NotActions": [],
"AssignableScopes": [
"/subscriptions/<Your_subscription_ID_here>"
]
}
- Then execute the following command:
azure role create --inputfile PMCAzureExampleRole.json
Outputinfo: Executing command role createinfo: Validating role definition+ Creating role definition "00hh0h00-00hh0-000h-h0h0-0h0h0h000hh"info: Created role definition 00ff0f00-00ff0-000f-f0f0-0f0f0f000ffdata: Name : PMC Azure Devdata: Id : 00gg0g00-00gg0-000g-g0g0-0g0g0g000ggdata: Description : PMC Azure Dev Roledata: AssignableScopes : 0=/subscriptions/00aaa000-00aa-0a00-0000-0a0000a0aa00data: Actions : 0=Microsoft.Compute/virtualMachines/read, 1=Microsoft.Compute/virtualMachines/*/read, 2=Microsoft.Compute/virtualMachines/start/action, 3=Microsoft.Compute/virtualMachines/deallocate/action, 4=Microsoft.Compute/virtualMachineScaleSets/read, 5=Microsoft.Compute/virtualMachineScaleSets/write, 6=Microsoft.Compute/virtualMachineScaleSets/start/action, 7=Microsoft.Compute/virtualMachineScaleSets/deallocate/action, 8=Microsoft.Compute/virtualMachineScaleSets/*/read, 9=Microsoft.Resources/subscriptions/resourceGroups/readdata: NotActions :data: IsCustom : truedata:info: role create command OK
7. Assign the Custom Role to Service Principal:
- The final step will be to map this custom role you have just created to the service principal:
azure role assignment create --objectId <Service principal Object Id> --roleId "<RoleId >" --scope /subscriptions/<Subscription ID>
Where:
- Service Principal Object Id is from Step 5
- Role Id is from Step 6 and
- Subscription ID is from Step 3
Output+ Finding role with specified name |data: RoleAssignmentId : /subscriptions/00aaa000-00aa-0a00-0000-0a0000a0aa00/providers/Microsoft.Authorization/roleAssignments/4ad11596-5f3b-4373-9e4b-871500916e5adata: RoleDefinitionName : PMC Azure Devdata: RoleDefinitionId : 00gg0g00-00gg0-000g-g0g0-0g0g0g000ggdata: Scope : /subscriptions/00aaa000-00aa-0a00-0000-0a0000a0aa00data: Display Name : PMC Azure Devdata: SignInName : undefineddata: ObjectId : cc00c00c-cc00-0c00-cc0c-000cc00c0000cdata: ObjectType : ServicePrincipal data:+info: role assignment create command OK
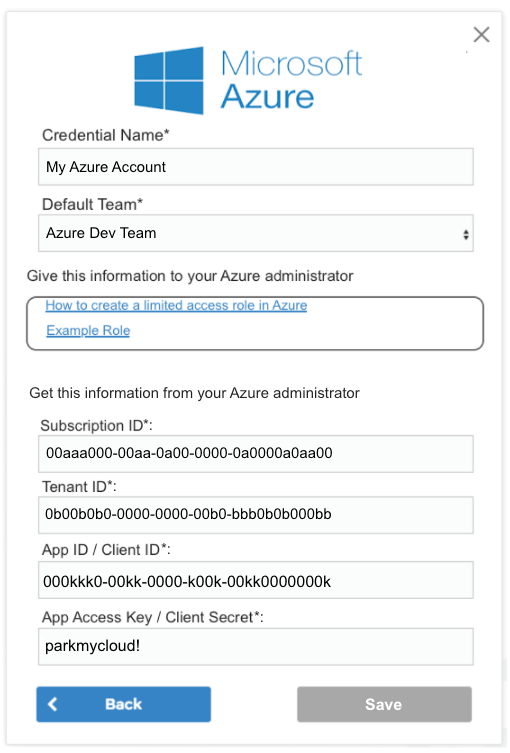
That completes the application configuration within Azure. Now, you merely need to fill in the blanks on the credential page, give it a name and select a team to complete the configuration within ParkMyCloud


Troubleshooting:

* List custom roles:
  azure role list --custom

* Show the current custom role:
  azure role show --name "PMC Azure Dev" --json

* Modify the current custom role:
  azure role set --inputfile PmcAzureRoleExample.json

* Remove a role assignment from a Service Principal:
  azure role assignment delete --objectId <Service Principal Object ID> --roleId <Role Id>
Related Articles
Creating An Azure Credential For ParkMyCloud
Goal The goal of this process is to configure limited access for ParkMyCloud to an Azure subscription. To do this you will need to obtain the following pieces of information to create the ParkMyCloud Azure credential: Subscription ID Tenant ID App ID ...Creating An Azure Credential Manually Using Windows Powershell
1. Install Azure Cmdlets in Windows Powershell: Open a Powershell window as administrator Run the following commands: Install-Module AzureRM Install-Module Azure You can verify proper installation by typing the following command: Get-Module Output: ...Creating An Azure Credential the Easy Way in Windows Using Powershell and get_azure_cred.ps1
We have created some helpful scripts in our public Github repository. One of those is a script called get_azure_cred.ps1, which runs in Windows and Powershell and will: Log you into your Azure account Create an application for you in your Active ...Creating An Azure Cred the Easy Way In Linux Using azure-cli and get_azure_cred.sh Script
We have created some helpful scripts in our public Github repository. One of those is a script called get_azure_cred.sh, which runs in Ubuntu Linux and will: Install nodejs, npm and azure-cli (if they are not already installed) Log you into your ...Setting Up Azure Active Directory (Free Version) As A SAML IdP Server for ParkMyCloud
When you followed our article on creating an Azure credential, that process included creating an application in Azure. We are now going to revisit one of those applications and configure some of its settings to configure Azure Active Directory as an ...